Wire a Dryer Outlet
Wire a dryer Outlet: (3-Prong)

Your particular house voltage is determined by your incoming power source to your house if whether it's 220 or 230 or 240 volts. Your dryer outlet will provide that voltage, what ever it may be.
These circuits are typically 220/230/240 volt circuits. The circuit breaker provides this voltage by connecting 2 separate 110/115/120 volts each when installing the circuit breaker into the breaker box panel. The red wire and the black wire each provide a separate 110/115/120 power source, so combined, they will supply a 220/230/240 volts to your dryer.
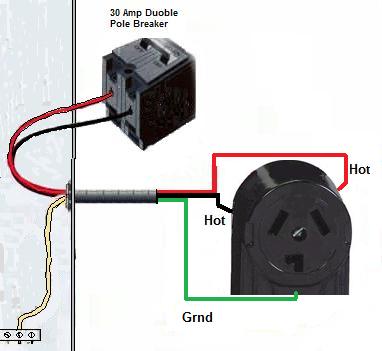
If you are attempting to wire a dryer outlet with a 3-prong receptacle, the wiring diagram above shows the proper connections for both ends of the circuit. This circuit originates from the breaker box containing a 2-pole 30 Amp breaker. This size breaker requires a minimum of a #10 gauge wire so the wire to be used would be a 10/2 with ground.
Now a 3-prong outlet is outdated from modern electrical codes but is accepted if you already have one in your home. If your running a new circuit, I highly recommend that you bring your outlet up to code and install a 4-prong dryer outlet. (See Below)
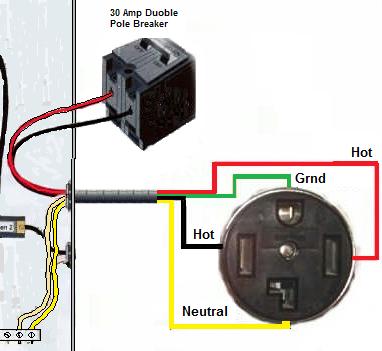
The difference between this diagram and the 4-prong outlet below is the addition of a neutral wire. The neutral line is a return line for the voltage and should not be done through the green ground wire, even though a neutral and ground are really the same, so new codes require a dedicated neutral line as well as a dedicated ground line. This just simply separates the ground circuit and neutral circuit versus having the ground line act as a neutral in the older circuit above.
Clear as mud right,
To wire a dryer outlet with a 3-prong receptacle involves connecting the necessary wires to provide power to the dryer while ensuring safety and compliance with electrical codes. Please note that many modern installations require a 4-prong dryer outlet due to safety considerations, but if you have an older dryer that uses a 3-prong plug, here's a guide on how to wire it:
Note:
It's important to follow your local electrical codes and regulations. If you're not confident in your electrical skills, consider consulting a licensed electrician.
Materials Needed:
- 30-amp double-pole circuit breaker
- 10/2 electrical cable (with ground)
- Dryer outlet box
- 3-prong dryer outlet receptacle
- Cable connectors
- Wire stripper
- Screwdrivers
- Wire nuts
- Electrical tape
- Voltage tester
Here's how:
- Turn Off Power: Before starting any electrical work, turn off power to the circuit you'll be working on at the main electrical panel.
- Choose Outlet Location: Decide where you want to install the dryer outlet. It's typically located a few feet off the floor and within a few feet of the dryer.
- Install Outlet Box: Mark the location of the outlet on the wall and cut a hole for the outlet box. Install the outlet box using screws or fasteners, ensuring it's securely attached to the wall.
- Prepare Cable: Strip about 6-8 inches of the outer insulation from the cable end using a wire stripper. Inside the cable, you'll find three insulated wires: black (hot), red (hot), and a bare or green wire (ground).
- Connect Wires to Outlet: Attach the black wire to the brass-colored screw labeled "X" on the dryer outlet receptacle. Connect the Red wire to the silver screw labeled "Y" on the receptacle. Connect the bare or green wire to the green screw (ground) on the receptacle. Tighten the screws securely.
- Install Outlet in Box: Carefully push the wires and the outlet cover back into the outlet box. Attach the outlet to the box using screws provided with the outlet.
- Wiring to the Breaker Panel: Run the other end of the cable to the electrical panel. Connect the black and red wires to the terminals of a 30-amp double-pole circuit breaker. Connect the bare or green wire to the grounding bus bar.
- Grounding: Ensure the grounding conductor is securely connected to the grounding system according to local codes.
- Test the Connection: Turn the main power back on. Use a voltage tester to confirm that there's power at the outlet.
- Secure Connections: Tighten all screws and wire connections inside the outlet box and at the panel. Use wire nuts to cap the ends of any unused wires, and wrap them with electrical tape for added safety.
- Close Up the Panel: Close the electrical panel securely.
Always prioritize safety and proper wiring techniques. If you're unsure about any step, it's recommended to seek the assistance of a licensed electrician.
Wire a dryer Outlet: (4-Prong)

(Yellow Wire = White)
To wire a dryer outlet with a 4-prong receptacle, the 4-prong dryer outlet wiring diagram above is ran using a 10/3 with ground cable.
As you can see, there is now an added dedicated neutral. The ground is now a dedicated wire also. But if you notice, both the neutral and the ground wires both connect to the same ground bar inside the panel box. As mentioned earlier, the neutral and ground are really the same but this wiring method is more accurate because a return line or "grounded neutral" should be a white wire and not green.
Some panel or breaker boxes will have a dedicated neutral bar and a dedicated ground bar, but they will still be physically connected. So you will wire the "White" neutral to the neutral bar and the bare copper or green wire will attach to the ground bar.
If you are attempting to wire a dryer outlet with a 4-prong receptacle, this involves connecting the necessary wires to provide power to the dryer while ensuring safety and compliance with electrical codes. A 4-prong outlet is commonly used in modern installations for added safety over the older 3-prong outlets. Here's a guide on how to wire a 4-prong dryer outlet:
Note:
It's important to follow your local electrical codes and regulations. If you're not confident in your electrical skills, consider consulting a licensed electrician.
Materials Needed:
- 30-amp double-pole circuit breaker
- 10/3 electrical cable (with ground)
- Dryer outlet box
- 4-prong dryer outlet receptacle
- Cable connectors
- Wire stripper
- Screwdrivers
- Wire nuts
- Electrical tape
- Voltage tester
Here's how:
- Turn Off Power: Before starting any electrical work, turn off power to the circuit you'll be working on at the main electrical panel.
- Choose Outlet Location: Decide where you want to install the dryer outlet. It's typically located a few feet off the floor and within a few feet of the dryer.
- Install Outlet Box: Mark the location of the outlet on the wall and cut a hole for the outlet box. Install the outlet box using screws or fasteners, ensuring it's securely attached to the wall.
- Prepare Cable: Strip about 6-8 inches of the outer insulation from the cable end using a wire stripper. Inside the cable, you'll find four insulated wires: black (hot), red (hot), white (neutral), and a bare or green wire (ground).
- Connect Wires to Outlet: Attach the black and red wires to the two brass-colored screws on the dryer outlet receptacle. It doesn't matter which hot wire goes to which brass screw. Connect the white wire to the silver screw labeled "N" (neutral) on the receptacle. Connect the bare or green wire to the green screw (ground) on the receptacle. Tighten the screws securely.
- Install Outlet in Box: Carefully push the wires and the outlet back into the outlet box. Attach the outlet to the box using screws provided with the outlet.
- Wiring to the Breaker Panel: Run the other end of the cable to the electrical panel. Connect the black and red wires to the terminals of a 30-amp double-pole circuit breaker. It doesn't matter which terminals that the red/black wire connect to on the circuit breaker. Connect the white wire to the neutral bus bar in the panel. Connect the bare or green wire to the grounding bus bar.
- Grounding: Ensure the grounding conductor is securely connected to the grounding system according to local codes.
- Test the Connection: Turn the main power back on. Use a voltage tester to confirm that there's power at the outlet.
- Secure Connections: Tighten all screws and wire connections inside the outlet box and at the panel. Use wire nuts to cap the ends of any unused wires, and wrap them with electrical tape for added safety.
- Close Up the Panel: Close the electrical panel securely.
As always, prioritize safety and proper wiring techniques. If you're unsure about any step, it's recommended to seek the assistance of a licensed electrician.


