How to Wire a 4-Way Switch
When learning how to wire a 4-way switch circuit, what were doing is simply
controlling the power flow (Switching off/on) to the load (a light,
lamp, outlet, ceiling fan etc..) from more than 2 different locations. a
couple examples would be:
At each end of a hallway and a switch halfway down the hallway
or at the top & bottom of a stairway and a switch by the front door.
Learning how to wire a 4-way switch is simply adding a switch to an already existing 3-way switch circuit. This allows you to control a load from other locations in addition to the (2) locations that a 3-way circuit provides. First of all we need to go over a little basic terminology on switches.
Go to my Switch Terminology Page where I discuss the terms used for the different types of home electrical switches. It should also help in understanding the functions of each type of switch.
Imagine you have a big room with three doors. You want to be able to turn the light on or off from any of those doors. A 3-way switch helps you do that. It's like having a light switch by each door, and you can control the light from any of those switches.
Now, let's say you have a really long hallway with four doors along the way. You still want to control the same light, but this time from all four doors. This is where a 4-way switch comes in. It works together with the 3-way switches. The 3-way switches are like the ones by the doors, and the 4-way switch is like a helper in the middle. It lets you control the light from any of the doors and the helper switch spot.
So, the 3-way switch helps you control the light from two places, and the 4-way switch helps you control it from more than two places, like in bigger spaces with more doors or switches.
Before going any further with the 4-way switch instructions, I would recommend you go to my Wiring a 3-way switch page and first become familiar with that circuit and how it functions.
OK, assuming you are all caught up on the 3-way concept, we will continue by making a 3-way circuit into a 4-way circuit. All that is required is wiring a 4-way switch between the (2) 3-way switches. Now don't let this be confused with where the switches are physically located in your home. This is how the circuit is structured. The switches can be physically located to your liking but you must keep in mind the ease of routing the wiring from point to point. Also, this example is just adding a single 4-way switch which will give you 3 locations to control your light. To add more locations to this circuit you just simply add additional 4-way switches in series with the existing 4-way switch.
We will assume that the circuit in these examples are controlling the power source to the same load. (a Single Light)
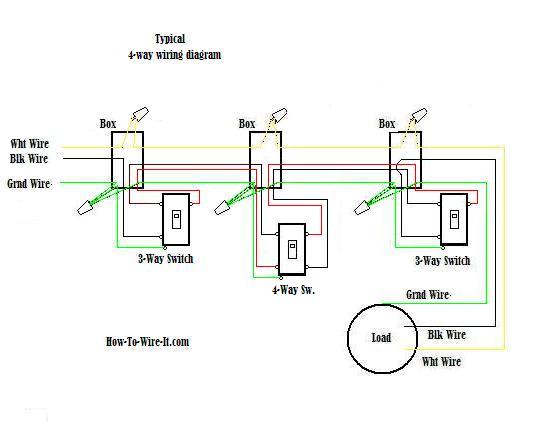
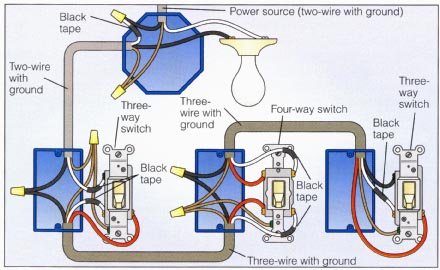
The diagram below will give you a good understanding how this circuit is wired.


As you can see, this is basically a 3-way circuit with a 4-way switch added between the (2) 3-way switches. Again, if you choose to have more locations controlling the load, then add additional 4-way switches. Keep in mind that the 4-way switches must always be between the (2) 3-way switches.
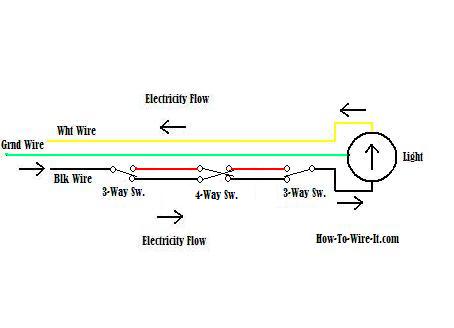
Now lets look at it from a flow point of view:

Using your mouse pointer, follow along with me as we go through the circuit. Now this one gets a little tricky by keeping track of what switch you toggle in your mind, just hang in there.
Now the power source (black) is coming in from the left. and goes through the 3-way to the black wire going to the 4-way. Then through the 4-way to the red wire going to the 3-way. Now it dead ends (not connected) which means the light is turned off. By toggling any switch, the light will now turn on. Choose a switch and follow the flow of the switch that changes state. Keep in mind how the 4-way switch works. Left connections toggle between the two right connections. So top left red connects to bottom right black and when toggled top left red connects to top right red. The bottom pole works in the same manner, It goes straight across.
Here is a Step-by-Step procedure on how to wire a 4-way switch.
- Power Source: Start by turning off the power to the circuit. Safety first!
- 3-way Switch 1: This is usually the first switch in the circuit. Connect the black wire (common terminal) from the 3-way switch 1 to the common terminal of the 4-way switch.
- 4-way Switch: The 4-way switch has two pairs of traveler terminals. Connect one traveler wire from the 3-way switch 1 to one traveler terminal of the 4-way switch. Then connect the other traveler wire from 3-way switch 2 to the other traveler terminal of the 4-way switch.
- 3-way Switch 2: Connect the black wire (common terminal) from the 3-way switch 2 to the common terminal of the 4-way switch.
- Light Fixture: Connect the black wire from the light fixture to the remaining terminal of the 3-way switch 2.
- Neutral and Ground Wires: Connect all neutral (white) wires together and all ground (green or bare) wires together in the electrical box. Do this for all switches and the light fixture.
- Testing: Turn the power back on and test the switches to make sure the wiring is correct. The 4-way switch should allow you to control the light from multiple locations.
Remember that it's essential to follow local electrical codes and safety guidelines when wiring a 4-way switch. If you're not confident in your electrical skills, it's advisable to consult a professional electrician to ensure the wiring is done correctly and safely. Electrical work can be dangerous, and safety should always be the top priority.
Allow Tim Carter from AskTheBuilder.com to show you some
great tips for installation on how to wire a 4-way switch.


