Wire A Ceiling Fan
To wire a ceiling fan we first have to know the options available on the fan. Most common fans either come with a light or without a light. Although you can get just a ceiling fan most units offer a light kit that can be added in the future. I will be going over the circuits required for all of the options mentioned.
Let's keep in mind that my site is about the wiring aspect only. As far as getting your ceiling fan installed, Please follow the manufacturers manuals and safety guidelines for proper mounting due to weight and other variables which can be an important factor.
More often than not, you're going to have a ceiling light fixture at the location you are planning on installing a ceiling fan. If this is the case, then odds are that this old ceiling light only has enough wires to switch off & on the fan and not the light. If so then a new wire must be ran to control the light as well. So instead of a 3-wire cable going to the fan, it must be replaced with a 4-wire cable. When taking down your old fixture you will be able to see if you have the correct cabling.
If you are installing a fan where there is no previous fixture, then you'll be running a new circuit to the fan and can accommodate for the light as well.
Although I will be going through these circuits on this page in some detail, I recommend you checkout my other pages that cover 2-way switches and 3-way switches. These pages can help you to determine how your circuits are wired or possibly help you decide how you want them wired especially if you are running a new circuit. Keep in mind that I refer to a load in those circuits which means a light, ceiling fan, outlet, etc..
These diagrams to follow are based on the ceiling fan wires having a color code of:
White = Neutral
Black = Fan
Blue = Light
Green = Ground
Some manufacturers may use different color codes so be sure to follow the instructions that come with your particular product.
Here's a list of different scenario's to wire a ceiling fan:
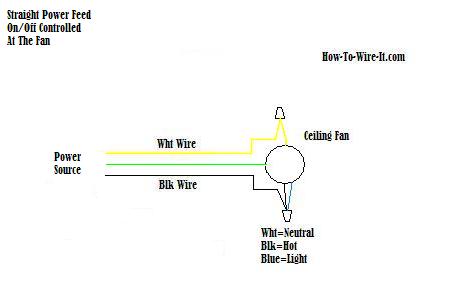
No Switches Controlling the fan. You turn on/off the light & fan from the ceiling fan controls:

This is assuming that you are installing a ceiling fan in a location that had no fixture there before. This would be a new circuit ran to the ceiling fan.
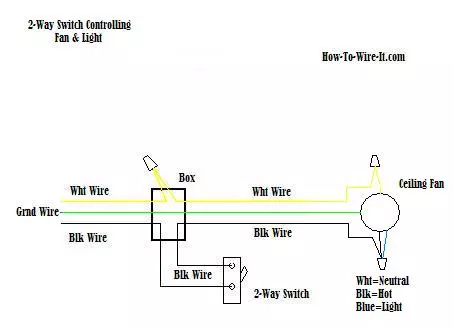
A single 2-way switch turns on/off both light & fan. (this one is fairly common. Using the switch to control the light then turning on/off the fan from the fan itself).

This diagram is for those who are replacing a light fixture with a ceiling fan. Your existing light fixture was controlled by a switch and only one switch. Chances are, you only have a 3-wire cable ran to the fixture so you would be limited to powering the ceiling fan & light both. Typically using the switch for the light and turning the fan on/off by the fan switch on the unit. Of course this is all based on not replacing the existing wiring that you currently have.
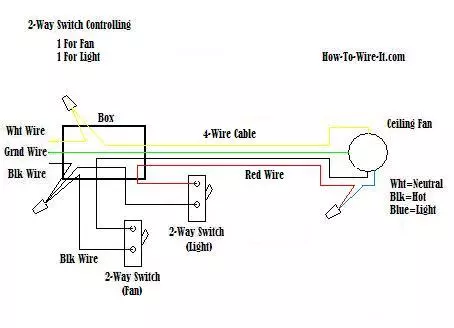
Two switches at one location. One 2-way switch that turns on/off the light and one 2-way switch that turns on/off the fan.

Maybe you are just replacing an old ceiling fan with a new one and you already had (2) separate switches. One controlling the light and one controlling the fan. Then this should look like your connections.
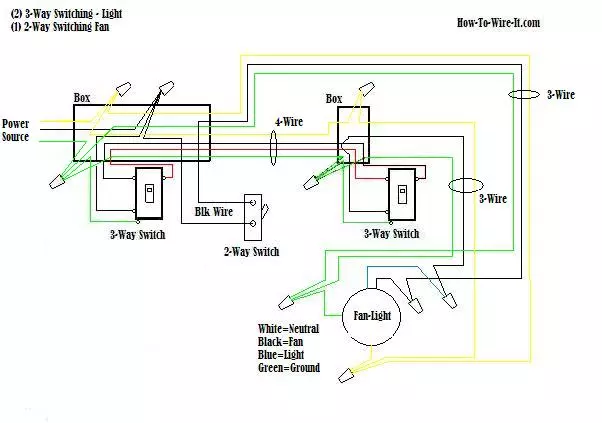
Now for the good one. This one is the same as above but an additional switch so you can turn on/off the light from 2 different locations. The fan is still operated from one location. The 2-way switches for the light will now change to 3-way switches.

The diagram above looks complicated but it's really not. Just focus on one circuit one at a time and it will fall right into place. Notice this circuit has a 3-wire cable "power source" coming into the double switch box. Then leaving the double switch box is a 3-wire cable going to the ceiling fan and a 4-wire cable going to the other 3-way switch. Then a 3-wire cable from there also going to the ceiling fan. Make connections as shown.
Step-by-step procedure to wire a ceiling fan
Materials you'll need:
- Ceiling fan
- Screwdriver
- Wire stripper
- Wire nuts
- Voltage tester
Here's How:
- Safety First: Turn off the power to the circuit at the circuit breaker box. Use a voltage tester to confirm that the power is off.
- Assemble the Ceiling Fan: Follow the manufacturer's instructions to assemble the ceiling fan components, including the fan blades, motor, and light kit (if applicable).
- Check Ceiling Box Wiring: Inspect the wiring in the ceiling electrical box where the fan will be installed. Make sure there are wires for the fan's motor and, if applicable, for the light kit.
- Prepare the Fan Wires: The fan wires usually include a black (hot), white (neutral), green or bare (ground), and sometimes a blue (light) wire. Strip about 1/2 inch of insulation from the end of each wire.
- Identify Ceiling Wires: The ceiling wires should include a black (hot), white (neutral), and green or bare (ground) wire. In some cases, there may be an additional red or blue wire for a separate switch for the light kit.
- Connect Ground Wires: Twist together the green/bare wire from the ceiling fan with the green/bare wire(s) from the ceiling. Secure the connection with a wire nut.
- Connect Neutral Wires: Twist together the white wire from the ceiling fan with the white wire(s) from the ceiling. Secure the connection with a wire nut.
- Connect Hot Wires: If you have a separate switch for the fan and light, connect the black wire from the ceiling fan to the black wire from the ceiling for the fan function. If you have a blue wire for the light kit, connect the blue wire from the ceiling fan to the black wire from the ceiling for the light function. Secure each connection with a wire nut.
- Secure the Wires: Carefully tuck the connected wires into the ceiling electrical box. If provided, attach the fan's ceiling bracket to the electrical box and secure it.
- Mount the Ceiling Fan: Follow the manufacturer's instructions to attach the fan to the bracket. Make sure the fan is securely mounted and balanced.
- Final Check and Testing: Double-check that all connections are tight and properly insulated with wire nuts. Install any provided cover plate or canopy to conceal the wiring. Turn the circuit breaker back on. Test the fan and light to ensure they work as expected.
Remember, this procedure provides a general overview, but your specific ceiling fan and wiring situation might have unique requirements. If you're not confident with electrical work, it's best to consult a professional electrician to ensure a safe and proper installation.


