How to Wire a 2-Way Switch
Learning how to wire a 2-way switch is about as simple as it gets when it comes to basic house wiring. When learning how to wire a 2-way switch circuit, we also need to understand the switches function. All you're really doing is controlling the power flow (Switching off/on) the load (a light, lamp, outlet, ceiling fan etc..)
First of all we need to go over a little terminology so you know exactly what is being discussed when learning how to wire a 2-way switch.
Go to my Switch Terminology Page where I discuss the terms used for the different types of home electrical switches. It should also help in understanding the functions of each type of switch.
Now a typical circuit will contain a 3-wire cable known as romex. The cable consist of a black wire, a white wire and a bare copper wire.
Black wire = Power or Hot wire
White wire = Neutral
Bare copper = Ground
When wiring a 2-way switch circuit, all we want to do is to control
the black wire
(hot wire) to turn on and off the load. This simple
diagram below will give you a
better understanding of what this circuit
is accomplishing.
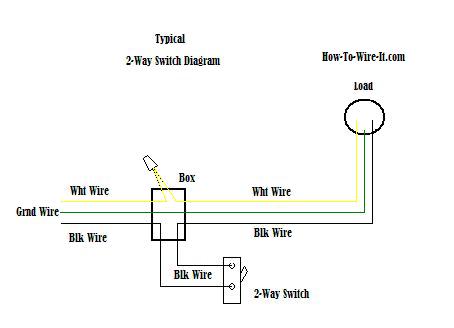
Now in the diagram above, The power source is coming in from the left. Notice the black wire is the only wire that we are controlling through the 2-way switch. You have an incoming hot wire (black) going to one screw (it does not matter if you use the brass or silver screw) on the side of the 2-way switch and a black wire from the other screw on the 2-way switch going to the load (light, ceiling fan etc..). The white wires are wire nutted together so they can continue the circuit.
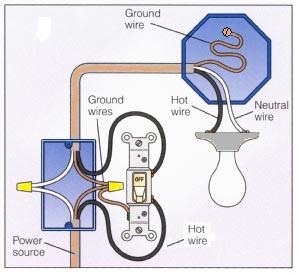
Now as for the ground wire. It is very important to connect the ground wire to the switch as well. The Green screw on the 2-way switch is for the ground so all ground wires should be connected as seen below.
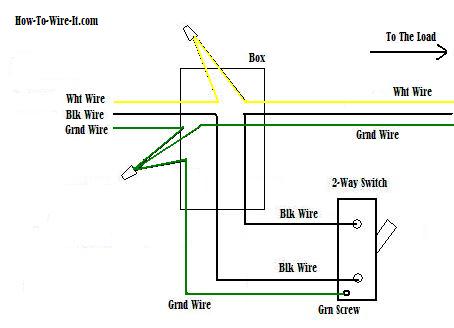
All ground wires (bare copper) are all now connected (incoming ground, load ground and switch ground). This makes for a safe protected circuit by having all grounds intact.
So what have we accomplished. By wiring a 2-way switch, The circuit below shows the basic concept of electricity flow to the load. Let's assume the load you are controlling is a light. The electricity flows from the hot wire (black) through the 2-way switch (shown in off position) and then to the light and returns through the neutral wire (white). This is a completed circuit.
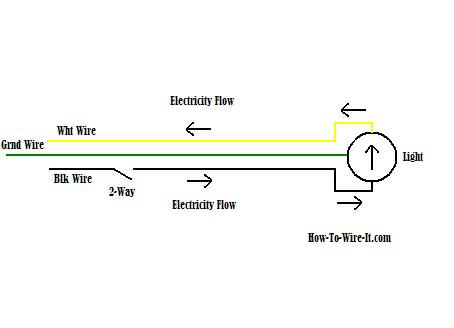
Now by understanding the diagram above, go up to the top diagram and by using the concept shown here, just use your mouse pointer on that diagram and follow the flow from black wire (hot wire) to the load and return through the white wire (neutral). This should give you a good basic understanding how the 2-way switch circuit works and will help you in adding or changing a 2-way switch.
So now that you have a basic concept of wiring a 2-way switch, let's look at the following 2-way switch diagrams to see which type of circuit scenario you have. After you have pulled your switch out from the wall, the wires in the box and connecting to the switch should look like one of the following.
Basic 2-Way Circuit - Power Coming In At Switch

Here you see the power is coming into the circuit through
the switch box, then to the light using a 3-wire cable.
Basic 2-Way Circuit - Power Coming In At Light
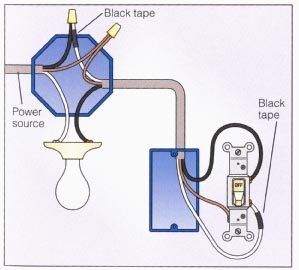
Here you see the power is coming into the circuit through
the light box, then to the switch using a 3-wire cable.
Power Coming In At Switch - With 2 Lights In Series
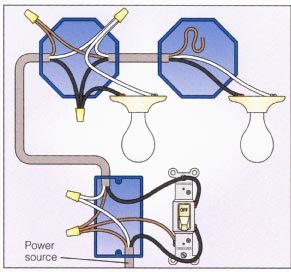
Here you see the power is coming into the circuit through the switch box, then to the double light boxes in series using a 3-wire cable for each light.
Power Coming In At Light - With 2 2-Way Switches and 2 Lights
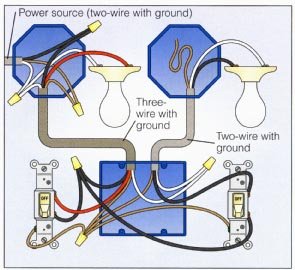
Here you see the power is coming into the circuit through the one of the light boxes, then to the light switches which are controlling each light individually, then on to the second light box. (Notice the hot side uses the "Red" wire from the first light. This is a 4-wire cable being used from 1st light to the switch box. The second light is only using a 3-wire cable).
Power Coming In At Light - With 2-Way Switch and Outlet
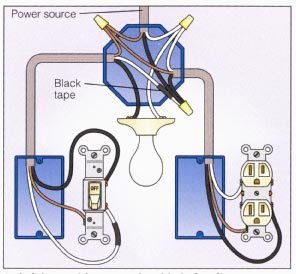
Here you see the power is coming into the circuit through the light box, then a 3-wire cable to the switch and a separate 3-wire cable to an outlet. (Notice the white wire from the switch is used as hot, therefore there is a piece of black tape on the white wire to indicate that it is being used as a hot wire).
Is the outlet switched or hot at all times? (Hot at all times. The hot wire is coming directly from the power source.)
Power Coming In At Switch/Outlet - With Light
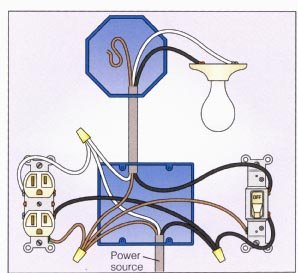
Here you see the power is coming into the circuit through
the switch & outlet box, then a 3-wire cable to the light.
Is the outlet switched or hot at all times? (Hot at all times.
The hot wire is coming directly from the power source.)
Here's a step-by-step procedure on how to wire a 2-way switch:
Materials and Tools You'll Need:
- One 2-way switch
- Electrical cable (usually 14/2 or 12/2, depending on the circuit's amperage)
- Wire stripper
- Screwdrivers
- Needle-nose pliers
- Voltage tester
- Electrical tape
- Wire connectors
Procedure:
- Safety First: Turn off the power to the circuit at the main breaker panel. Use a voltage tester to ensure there is no electricity flowing through the circuit you are working on. Test the switch to be certain.
- Identify the Wires: In a 2-way switch setup, you will have one 2-way switch and one light fixture or electrical device. Identify the two wires in the electrical cable: one is usually black (hot), and the other is typically white (neutral).
- Remove the Old Switch: Unscrew the switch plate and remove the old switch from the electrical box.
- Connect the Hot Wire: Connect the black (hot) wire from the electrical power source to one of the terminals on the 2-way switch. It doesn't matter which terminal you choose; the order of the wires on the switch doesn't affect the functionality of the switch.
- Connect the Load Wire: Connect the black wire from the load electrical cable to the other terminal on the 2-way switch.
- Neutral Wires: Connect the neutral wires together with a wire nut. The neutral should run directly from the power source to the load.
- Grounding (If Necessary): If your electrical box has a ground wire (usually bare or green), connect it to the green or bare grounding terminal on the switch.
- Secure the Switch: Carefully tuck the connected wires back into the electrical box. Attach the switch to the box using the screws provided.
- Finishing Touches: Attach the switch plate to the switch and secure it with screws.
- Test the 2-Way Switch: Turn the power back on at the main breaker panel. Test the 2-way switch by flipping it up and down. The light should turn on and off from the single switch location.
- Double-Check and Insulate: After ensuring that the switch works correctly, use electrical tape or wire connectors to secure the wire connections in the box. Replace the switch plate cover.
Remember that it's crucial to follow local electrical codes and safety
guidelines when wiring a 2-way switch.
If you're not confident in your electrical skills, it's advisable
to consult a professional electrician to ensure the wiring is
done correctly and safely.
Electrical work can be dangerous, and safety should always be the top priority.
Allow Tim Carter from AskTheBuilder.com to show you
some great tips for installation on how to wire a 2-way switch.


