How to Install a Dimmer Switch
How to install a Dimmer switch. Installing or wiring a Dimmer switch is as simple as Wiring a 2-way switch. If you're just replacing an already existing 2-way switch, then your objective should be as easy as swapping the wires from one switch to the other. If you feel the need to get more knowledgeable of the task at hand, I recommend going to my How to wire a 2-Way Switch page to get more familiar with your the basics of switch wiring. Also if you need to go over a little terminology so you know exactly what is being discussed. Go to my Switch Terminology page where I discuss the terms used for the different types of home electrical switches. It should also help in understanding the functions of each type of switch.
Dimmers come in two basic wiring configurations. A standard single-pole
dimmers (2-way) or three-way dimmers. With a standard 2-way dimmer, a
single switch controls a single light. With a three-way dimmer, you can control
a light from 2 different locations. For this, You’ll need one three-way dimmer and one
three-way switch. This lets you dim from one location and turn the
lights on and off from another.
When installing a Dimmer switch, all you're really doing is controlling the amount of voltage flow to a light which makes it dim at a low setting to a fully bright light at maximum setting.
Now a typical circuit will contain a 3-wire cable known as romex. (See my Romex Cable page to get familiar with the different types of wire) The cable consist of a black wire, a white wire and a bare copper wire.
Black wire = Power or Hot wire
White wire = Neutral
Bare copper = Ground
When wiring a Dimmer switch circuit, all we want to do is to control the black wire (hot wire) to turn Dim/Brighten the load. This simple diagram below will give you a better understanding of what this circuit is accomplishing.
How to install a dimmer switch
Materials you'll need:
- Dimmer switch
- Screwdriver
- Wire stripper (optional)
Step 1: Safety first Before you start, turn off the power to the circuit that controls the light you want to dim. You can do this by flipping the corresponding circuit breaker in your electrical panel.
Step 2: Remove the old switch Take off the cover plate of your old switch by unscrewing the screws holding it in place. Then, unscrew and gently pull out the old switch from the electrical box in the wall.
Step 3: Examine the wiring You'll see several wires inside the electrical box. Typically, you'll find a black (or red) wire, a white wire, and a green or copper wire. The black (or red) wire is the "hot" wire that carries the electrical power, the white wire is the neutral wire, and the green or copper wire is the ground wire.
Step 4: Connect the dimmer switch Your dimmer switch will have three wires - a black or red wire, a green or copper wire, and sometimes a third wire (usually red or blue) that might be labeled "common" or "load."
- Connect the black or red wire from the dimmer switch to the black (or red) wire in the electrical box. You can use a wire nut to secure them together. If your dimmer switch has a third wire labeled "common" or "load," ignore it for now.
- Connect the green or copper wire from the dimmer switch to the green or copper wire in the electrical box. This is the ground connection, which helps to protect you from electrical shock.
Step 5: Optional connection for 3-way switches If you have a 3-way switch setup (where one light is controlled by two switches), you might have an additional wire in the electrical box. In this case, you'll need to consult the dimmer switch's manual to correctly wire the "common" or "load" wire.
Step 6: Tuck the wires back into the box Gently push the wires back into the electrical box, being careful not to pinch or damage them. Then, carefully attach the dimmer switch to the electrical box using the screws provided.
Step 7: Install the dimmer switch cover plate Place the dimmer switch cover plate over the switch and secure it with the screws provided.
Step 8: Turn the power back on Finally, go back to your electrical panel and flip the circuit breaker back to the "on" position to restore power to the dimmer switch.
That's it! That is how to install a dimmer switch. Now you can use the dimmer switch to adjust the brightness of your light fixture. Enjoy the customizable lighting! Remember to always follow safety precautions when working with electricity. If you're unsure about anything, it's best to consult a professional electrician.

Now in the diagram above, The power source is coming in from the
left. Notice the black wire is the only wire that we are controlling
through the dimmer switch. You have an incoming hot wire (black) going to
one screw (it does not matter if you use the brass or silver screw) on
the side of the dimmer switch and a black wire from the other screw on
the dimmer switch going to the load (light, ceiling fan etc..). The white
wires are wire nutted together so they can continue the circuit.
Now
as for the ground wire. It is very important to connect the ground wire
to the switch as well. The Green screw on the dimmer switch is for the
ground so all ground wires should be connected as shown below.
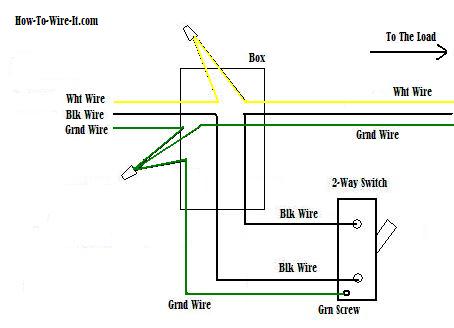
All ground wires (bare copper) are all now connected (incoming ground, load ground and switch ground). This makes for a safe protected circuit by having all grounds intact.
Watch the following Video for some great tips
on installing and wiring a Dimmer Switch.